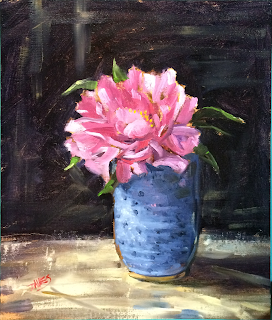
Direct Painting--Japanese Tree Peony
When people think of the how of painting, the direct method of painting is what many people assume most painters use, and this is largely the case for most abstract and much of realist painting. The indirect method is currently making a comeback, and I may discuss it in another post. For now, the direct method, which seems simple, but if done well, is surprisingly complicated. To start, you may or may not have an underdrawing, tone, or underpainting, but you will have a series of brush strokes that are as precise as possible. The paint will be mixed to the exact hue and value--shade, tint, tone--lifted from the palette with the exact size and shape brush needed for the expected mark and deliberately applied by dragging the color on the tip of the brush, not the bristles across the desired area. The artist may twist the brush, press to fan it out, or manipulate it in some other way to get the exact brush shape desired to make the exact mark. If the mark is incorrect or inarticulate, it is scraped or wiped off and redone. This is a skill that can only be learned through years of practice.
In this detail shot, you can see the individual strokes in the leaf and petal. The leaf is created in a multi-step process. First, work from front to back, or from dark to light. I lay in the broad shadow area of the leaf in one stroke from right to left, lightly dragging the thinned paint, manipulating it by twisting the filbert from thick to thin then lifting quickly at the end. Because I use Gamblin Galkyd Lite, the paint dries rapidly.
Once it has gotten slightly tacky, I mix a brighter tone and use a smaller, old frayed brush--a round--and pick up a very small bit of paint. This where experience comes in. Too much paint, and it comes off the brush in an opaque uniform smear (which is great if that's what you want), or if you use too little you don't get to the end of the stroke or it fragments more than you want. Or if you use too much media, it covers too smoothly and is much too transparent (again, that's fine if that's the effect desired). As you can see, the highlight in light green is two strokes each one breaking at the end creating a dazzle effect of light interacting with texture. Just use this method stroke by stroke, calculating exact color, mixing the right media and amount, using the right brush, manipulating the brush just so while getting the drawing correct--all at the same time--and you will have a gorgeous painting in no time.


Comments
Post a Comment